Article on The Internet Mini Encyclopædia |
Article on The Internet Mini Encyclopædia |
Flip/Drop Front A Panel Fasteners/Securing/Holding
If you are fitting a removable front to your mini you will hopefully already be in possession of a pair of bonnet pins to secure the FRONT edge by having these pointing out from the holes in the subframe formerly occcupied by the front teardrop mounts and then through the front in the big dimples in the moulding .....EASY...
DON'T fit the pins yet as the A Panels cannot be "moved " and the position of the holes in the front you have to drill in for the pins depends on the up-down alignment of the front, and this may change depending on how it lines up with the A Panels.... HOWEVER you can BEND the bonnet pins to raise or lower the front edge if you have already done it
Now how to secure the join between the A Panel and the front?
If you "GOOGLE" for images of Mini Miglia or MINI 7 (MINI SE7EN) racers you might see what look like little discs along these edges?
FAR better than rubber straps and over-centre catches that can pull hard on (and uproot) the A panels which were probably not designed to be held in tension.....
 These
"discs" are called DZUS fasteners that pull and hold the 2 panels
together AND don't shake loose BUT give a nice smooth line to the edge......
IMPORTANT, these DZUS are not really designed to PULL the front forward or backwards to align and make up for bad location THEY ARE ONLY THERE to clamp the 2 together, so ensure the front is sitting perfectly aligned BEFORE FITTING THE DZUS and all you need is to GENTLY pull the wings in to meet the A panel line.
I have found using 2 trolley jacks or axle stands along with blocks of wood enables you to hold and orientate the front into the right position during the DZUS fitting....
CAUTION: FIBREGLASS can be fragile/brittle so do ensure you are using the right drills and drilling technique for the material. Carbon Fibre drop front are a joy to work on as they "work" like a less brittle material.....
Mounting the 'Receptacle'
First get hold of two strips of 1.5mm -2 mm aluminium approx 50cm x 10cm, these are oversized but can be trimmed down to make a couple of mounting/aligning panels the DZUS RECEPTACLES will secure to.......
Now calculate the combined thickness of the drop front material on the A Panel joining edge and then ADD the thickness of the mounting ally plate, now order a set (4 or 6) DZUS and springs for this clamping thickness
I buy my DZUS from Merlin Motorsport based at Castle Combe in the UK: http://www.merlinmotorsport.co.uk/
Call them on +44 (0)1249 782101. Fax them on +44 (0)1249 782161 Their address is: Merlin Motorsport, Castle Combe Racing Circuit, Chippenham, Wiltshire, SN14 7EY
You can also by the springs prefitted to small mounting plates BUT on the average Mini you might want a longer mounting plate to keep the front and A Panel aligned (pure cosmetics)
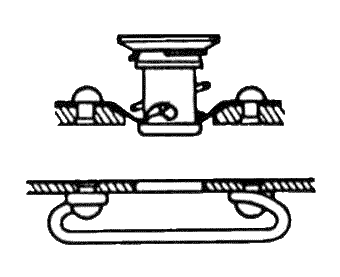
The image above of a complete fitted DZUS came from their site and is used with permission
My fitting technique
 Have
the ally mounting plates already fitted (using pot rivets) to the A Panels!
NOW You may have to bend the leading edge/middle of the ally mounting plates INWARDS to enable the trailing edges of the drop front to fit snug against the edge of the A panel
PLEASE MAKE SURE THE FRONT IS FITTING 100% correctly beforeyou DRILL ANYTHING !!!!!!!!!!
TAKE YOUR TIME, depending on the quality of the moulding this may take you AN HOUR OR TWO and REMEMBER once you trim any glass fibre off the front it is a one way trip usually, ditto you don't want to have to drill lots more holes in the front than you need.......
Turn a DZUS around so the slotted part is compressed against the front along the edge where you want the DZUS, locate the first DZUS where you want it on the front......
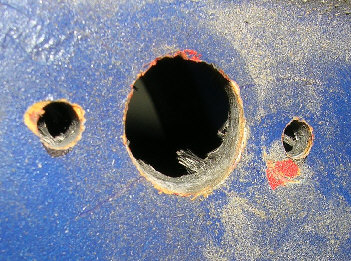
Use a black felt tip pen thru the holes to mark the location of the two 3mm holes in the fitting on the front. Remove the DUS and drill out the 2 3mm holes for the DZUS
Ensuring the front is located correctly, drill the 3mm holes in the mounting plate THROUGH the 3mm holes in the drop front into the mounting plate behind ( THIS ENSURES BOTH PARTS are in register)
Now using a DZUS clamping spring as a guide, mark the centre point of the big hole needed on both parts to allow the spring loaded part of the fitting to extend though the front AND the mounting panel...... if you trace the line of the spring on the mounting panel with the small holes of the spring over the 3mm holes THEN flip it to get another line ( forming an X) the X should mark the centre of the "big hole"
You may wish to complete the installation of the first DZUS and have it clamping the still supported front in place BEFORE you fit the second, this ensures they line up!
Note from the line drawing above the fact that countersunk rivets are used AND the HEADS are facing, I have used standard 3mm rivets which do stick out by a fraction of a mm allowed for in the "clamped thickness" and driven them in from the outside of the front...this just LOOKS nicer
The spring is best secured by holding it close to the ally plate while pulling down the rivet gun to ensure the rivet head spreads before and not AFTER the loop in the spring..SEE how the spring is facing?
After fitment you may have to bend the spring slightly to ensure:
1) it is central across the hole.......
2) it is the right distance away from the face of the mounting panel to enable the rotating mechanism to "grab" it....
ALWAYS ensure the front is STAYING aligned during all stages of the DZUS fitting process as you have little room for error
Have fun!!!
Added by FB 15 November 2004 after doing it