Article on The Internet Mini Encyclopædia |
Header
SSI Insert revised (no index tag!): 22-Feb-2016
Article on The Internet Mini Encyclopædia |
Is Metro radiator fitting a hard job to do? The IME's
creator, Scott Beavis, talks us through it.
"Yes, fairly hard. On a scale of 1 to 10 then I'd say 8. Not because it is
fiddly to fit, but because you need to do a lot of thinking and use a bit of
ingenuity to make it all work. There is a LOT more to it than simply binning the
side rad and whacking one on the front. You need to think about lots of things
including...
1) Clearance....you will need to mod/move alto, dizzy, oil filter, etc
2) Plumbing.....you will need different top and bottom hoses, not to mention new
oil routing
3) Filling......no rad cap on a metro rad...you will need an expansion bottle
4) Air flow.....it will over heat when you sit in traffic...you need an electric
fan
5) Bodywork.....do you need to modify the front end?
Looking at each of these points in turn....
1) Clearance
------------
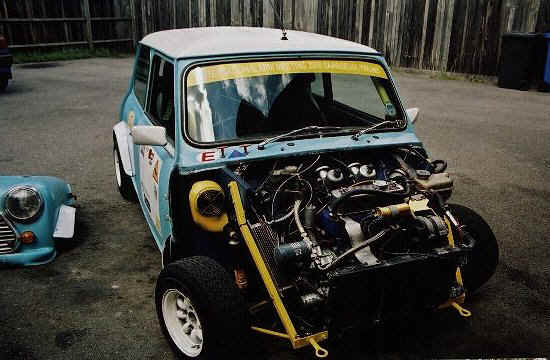
The BIG problem which needs most thought : How the hell do you fit it in there?
This is how I have done mine....
There are several types of metro rad. Some have pipes at the same end, some
diagonally. Some are thin, some are thick. I am using a Mk1 metro rad which is
thicker and has the pipes at the same end. This is easier to plumb in, cools
better due to higher water capacity, but is thicker so it more difficult to
accommodate. The Mk2/3 rad are thinner, but are diagonally piped.
The rad does not sit on the subframe front member, it sits on small triangular
brackets which stick out from the subframe. The metro rad has two small hollow
'legs' in each corner about 8mm diameter. I drilled a 2mm hole through each
lower leg and when it is stuck through the bracket I put some R-clips through
the legs to stop them jumping out of the brackets.
On the top of the rad I have cut the legs off. There are two threaded holes in
the top which you can use for a bracket to the engine or body. Be aware of
engine movement. If the top of the rad is connected to eg: a head stud and the
bottom on the subframe then the rad will be shaken about a bit. I have used 10mm
lengths of rubber heater hose sleeving on the lower legs to absorb the
vibrations. The bracket from the top of my rad is aluminium and is curved to
allow a bit of flex. It connects to one of the head studs.
The bracket can be clearly seen in these photos...
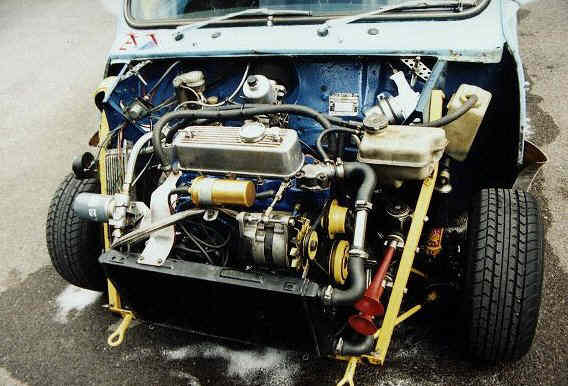
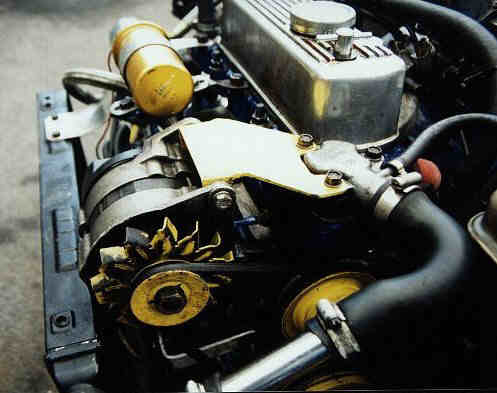
You will find clearance problems with the alternator,
dizzy and oil filter.
The alternator will need to be moved up. I made up a new bracket out of 3mm
steel plate to allow it to be mounted between the water pump and the thermostat
housing. Make sure you use ALL 3 mounting lugs or it'll break off. You will also
probably need the smaller water pump pulley to allow the belt to clear the head.
The belt I am using is a 925mm Merc S class power steering belt. Go into
Halfords and get a belt the right length and cross section shape. They are
marked in mm length (eg: HB925A belt is 925mm long with 'A' profile).
The alternator installation is shown here...
The dizzy is easier. You simply need a side exit cap.
There are too types..."5 right" or "2 left, 3 right". The second type is the one
to go for as it is even lower profile. It is a Maestro 1600 cap and is very hard
to get hold of these days. Halfords don't seem to stock them. I paid 17 quid for
mine from Minispeed. The cap will be a screw down type so you'll need to file
some grooves for the spring clips to hook onto.
The oil filter is a bit of a nightmare. In order to fit in the electric fan you
need to re-locate the filter to a remote head. Use a Mocal one (~15 quid from
Demon Tweeks) or look for remote types from other cars in the scrappers. The
tricky bit is getting the oil into the block. You will need some sort of special
adapter. You can buy these from people like Merlin Motorsport, but I chose to
make up my own from a block of aluminium. My braided oil cooler hose had a 1/4"
BSP tapered thread on the end. I drilled and tapped the adapter block and bolted
this to the engine block.
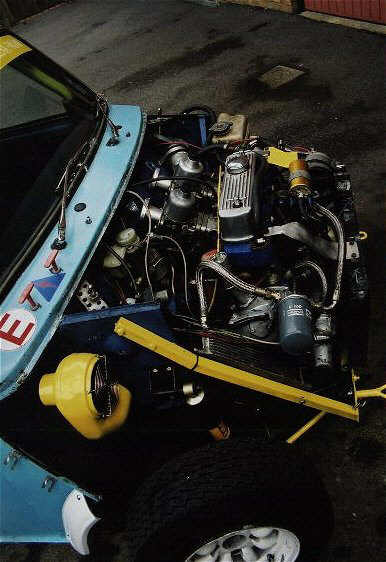
Oil adapter block is shown here...

Watch the problem of oil drain down. I use a Golf GTi
filter (same thread / size as mini one, just longer) as this has a non-return
valve in it.
2) Plumbing
-----------
This section is not so difficult. You will need different top and bottom hoses
and you will need to connect to the expansion bottle. I achieved this by using
the top tier of a metro stat housing, three top hoses, two bottom hoses and some
1" diameter chrome towel rail from B&Q. For the top hose, rotate the stat
housing so that it points towards the right (as viewed standing in front the
car). Then use two top hoses and about 8" of chrome pipe to make the two 90'
bends. If your rad is the diagonal type you'll need to do something different,
probably with a much longer piece of chrome pipe going across the front of the
engine. Beware that the metro uses ~1.25" pipe and the mini is ~1" so it can be
tricky getting the mini top hoses on. Dipping the hoses in boiling water will
soften them. Use grease and wear thick gloves. The hoses will perish sooner, so
you may want to look at the original metro hosing to see if you can use it.
On the bottom hose, you need a 90' bend from the lower end of the standard mini
bottom hose to some chrome pipe, to another 90' mini top hose at the rad outlet.
I made the first bend from a section of mini bottom hose because you need a
branch to connect to the expansion bottle.
The metro stat housing has a small pipe sticking out the side. This connects to
the balancing pipe on the side of the expansion bottle. This is necessary to let
air/steam out of the cylinder head.
3) Filling
----------
There is no rad cap on a metro rad so you will need an expansion bottle. Best to
use the metro one which uses a mini rad cap. Fill the system here. Mount the
expansion bottle over near the wiper motor and higher than the cylinder head.
4) Air flow
-----------
>Is there an electric fan on there as well now? A std Metro one?
For road driving you will need an electric fan. This is where racers have the
advantage as they don't require one. The metro fan is quite bulky so best to get
a Kenlow or Pacet fan and mount it either a) to the rad itself or b) on brackets
from the engine. Be careful that engine movement doesn't cause the fan blades to
strike the rad.
The metro rad has a thermo switch in the side of it. This makes its contacts at
~98'C which personally I think is too high. It is advisable to have a manual
over-ride switch in the car.
5) Bodywork
-----------
You will need to modify the bodywork to accommodate the rad. This is easiest
with a fibreglass front end.
> Do you HAVE to have your grille sticking out a bit?
The grille can be attached with grille buttons. Depending on how you've done the
alto and oil filter, and more importantly which metro rad type you are using,
will dictate whether the rad can be fitted within the body with the grille
fitted correctly. My rad sticks out slightly at the top so my grille is mounted
on 4 grille buttons about 1" from the body.
Why bother then?
----------------
Not only does it look seriously good and pull the crowds at the shows, but the
front rad is a much better system. No mechanical fan means more power and with
the big rad at the front you get much better cooling. It is safer because of the
expansion bottle and you don't have to wait for the system to cool so much
before opening the cap to fill it.
Latest pictures September 2000
http://www.geocities.com/scottbeavis/septem/septem.html
Slightly older pictures June 2000
http://www.geocities.com/scottbeavis/june/june.html
Quite old pics April 2000, some links bad...
http://www.geocities.com/scottbeavis/april/april.html